티스토리 뷰
(공부 책 : Vue.js Quick Start )
props와 event
앞서 부모 컴포넌트와 자식 컴포넌트 사이에 속성(Props)와 이벤트(Event)를 이용해 상호작용한다 이야기한 적 있습니다.
Vue 컴포넌트들이 부모-자식 관계로 형성되었을 때
컴포넌트 내부 데이터는 캡슐화되기 때문에 다른 컴포넌트 앱에서 접근할 수 없습니다.
이 때문에 부모는 자식 컴포넌트에 필요한 정보를 속성(Props)를 이용해 전달하고
자식 컴포넌트는 이벤트(Event)를 이용합니다.
1. props를 이용한 정보 전달
<template id="listTemplate">
    <li>{{globalGreeting}}</li>
</template>
<script type="text/javascript">
    Vue.component('list-component', {
        template: '#listTemplate',
        props: ['globalGreeting']
    })
</script>

<body>
    <div id="app">
        <ul>
            <list-component global-greeting="Hello"></list-component>
            <list-component global-greeting="안녕하세요"></list-component>
            <list-component global-greeting="こんにちは"></list-component>
        </ul>
    </div>
</body>
<script type="text/javascript">
    var vm = new Vue({
        el: "#app"
    })
</script>
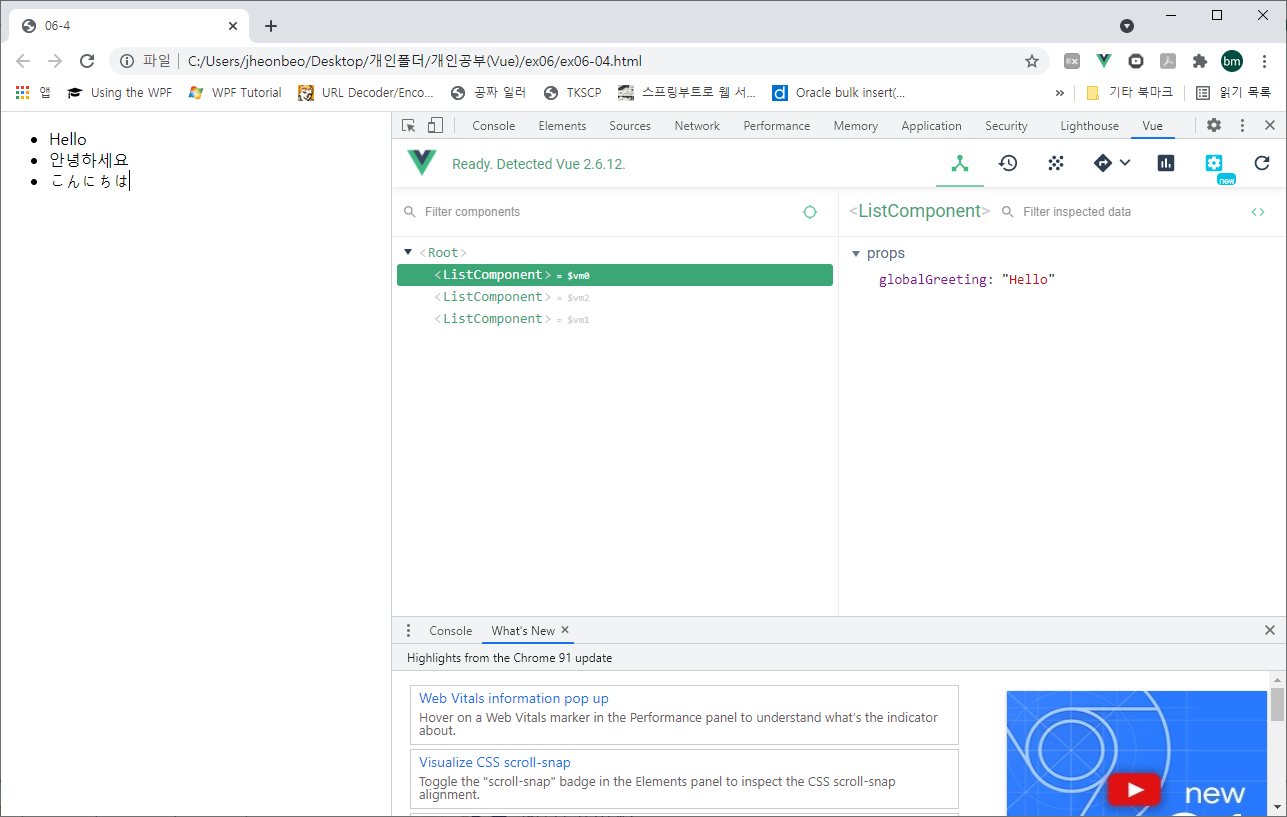
props를 이용한 정보전달 방법은 Vue 컴포넌트를 정의할 때 props라는 옵션을 작성하고 props명을 배열로 나열하면 됩니다.
위 예제는 list-component 컴포넌트를 작성하면서 globalGreeting이라는 이름의 속성(props)를 정의했습니다.
이 속성을 통해서 전달된 정보는 템플릿 문자열을 통해서 출력됩니다.
!!! 다만 이를 사용할 때 주의할 점이 있습니다.
속성명을 정의할 때 카멜 표기법을 사용했다면 태그에서는 반드시 케밥 표기법을 사용해야 합니다.
이는 태그 작성 시 특성은 대소문자를 구분하지 않기 때문입니다.
예제에선 globalGreeting은 global과 greeting 두 단어 이상이 연결되었기 때문에 두 번째 단어 첫글자만 대문자로 표기하는 카멜 표기법을 사용했습니다.
하지만 globalGreeting 그대로 태그에서 사용하게되면 코드 실행시 메세지 출력이 되지 않는걸 확인할 수 있습니다.
정상적으로 실행하려면 위 코드처럼 global-greeting으로 표기해야 메세지가 정상적으로 출력됩니다.
1-1. 속성의 유효성 검증
속성을 정의할 때 엄격한 유효성 검증이 필요하다면 배열이 아닌 객체 형태를 사용할 수 있습니다.
<template id="listTemplate">
    <li>
        {{globalGreeting}} - {{count}}
    </il>
</template>
<script type="text/javascript">
    Vue.component('list-component', {
        template: '#listTemplate',
        props: {
            globalGreeting: {
                type: String,
                default: '안녕하세요'
            },
            count: {
                type: Number,
                required: true
            }
        }
    })
</script>

<body>
    <div id="app">
        <ul>
            <list-component global-greeting="Hello" count="10"></list-component>
            <list-component global-greeting="안녕하세요" :count="20"></list-component>
            <list-component global-greeting="こんにちは"></list-component>
            <list-component v-bind:count="40"></list-component>
        </ul>
    </div>
</body>
message는 문자열 형식이며 기본값으로 '안녕하세요'라 지정하였고 count는 숫자형이며 필수 입력 대상임을 지정했습니다.
실행해보면 모든 문자열은 화면에 정상 표시되지만 "Hello"의 경우 둘다 문자열로 표시되었다 에러나고, "こんにちは"의 경우 count가 없다 에러가 뜹니다.
"Hello"에서 count는 숫자형이라 명시했음에도 불구하고 "10"이 문자열로 초기화되는건 리터럴로 속성을 전달했기 때문입니다.
"10"과 같은 리터럴은 자바스크립트 구문으로 인식되지 않고 문자열 값 그대로 전달됩니다.
이를 해결하기 위해선 "안녕하세요"란의 :count처럼 v-bind를 사용하시면 됩니다.
v-bind를 사용한 "안녕하세요"의 경우 message는 문자열, count는 숫자형으로 제대로 초기화됩니다.
1-2. 배열, 객체 속성
또 한 가지 주의할 부분은 속성으로 전달할 값이 배열이나 객체인 경우입니다. 이 경우 기본값을 부여하려면 반드시 함수를 사용해야 합니다.
<template id="listTemplate">
    <li>
        {{globalGreeting}} - {{count}} - {{countries}}
    </il>
</template>
<script type="text/javascript">
    Vue.component('list-component', {
        template: '#listTemplate',
        props: {
            globalGreeting: {
                type: String,
                default: '안녕하세요'
            },
            count: {
                type: Number,
                required: true,
                validator: function(value) {
                    return value > 10
                }
            },
            countries: {
                type: Array,
                default: function() {
                    return "['대한민국']";
                }
            }
        }
    })
</script>

<body>
    <div id="app">
        <ul>
            <list-component global-greeting="Hello" :count="5" :countries="english"></list-component>
            <list-component global-greeting="안녕하세요" :count="20" :countries="korean"></list-component>
            <list-component global-greeting="こんにちは" :countries="japanese"></list-component>
            <list-component v-bind:count="30"></list-component>
        </ul>
    </div>
</body>
<script type="text/javascript">
    var vm = new Vue({
        el: "#app",
        data: {
            english: ['미국', '영국', '호주'],
            korean: ['대한민국'],
            japanese: ['일본', '후쿠오카']
        }
    })
</script>
위 코드에서 countires 속성은 배열형입니다.
배열이나 객체의 기본값을 부여할 때 함수의 리턴값으로 부여하도록 합니다.
또한 속성값을 전달할 때는 v-bind 디렉티브를 이용하면 됩니다.
2. event를 이용한 정보 전달
event를 이용한 방법은 사용자 정의 이벤트를 활용합니다.
자식 컴포넌트에서는 이벤트를 발신(emit)하고 부모 컴포넌트에서 v-on 디렉티브를 이용해 이벤트를 수신합니다.
<!-- child Component 시작 -->
<style>
    .buttonstyle {
        width: 120px;
        height: 30px;
        text-align: center;
    }
</style>
<template id="childTemplate">
    <div>
        <button class="buttonstyle" v-on:click="clickEvent"
            v-bind:data-test="buttonInfo.value">{{ buttonInfo.text }}</button>
    </div>
</template>
<script type="text/javascript">
    Vue.component('child-component', {
        template: '#childTemplate',
        props: ['buttonInfo'],
        methods: {
            clickEvent: function(e) {
                this.$emit('timeclick', e.target.innerText, e.target.dataset.test);
            }
        }
    })
</script>
<!-- child Component 끝 -->
<!-- parent Component 시작 -->
<template id="parent-template">
    <div>
        <child-component v-for="s in buttons" v-bind:button-info="s"
            v-on:timeclick="timeclickEvent">
        </child-component>
        <hr />
        <div>{{ msg }}</div>
    </div>
</template>
<script type="text/javascript">
    Vue.component('parent-component', {
        template: '#parent-template',
        props: ['buttons'],
        data: function() {
            return {
                msg: ""
            };
        },
        methods: {
            timeclickEvent: function(k, v) {
                this.msg = k + ", " + v;
            }
        }
    })
</script>
<!-- parent Component 끝 -->

<body>
    <div id="app">
        <parent-component :buttons="buttons"></parent-component>
    </div>
</body>
<script type="text/javascript">
    var vm = new Vue({
        el: "#app",
        data: {
            buttons: [{
                text: "Hello",
                value: "영어"
            }, {
                text: "안녕하세요",
                value: "한국어"
            }, {
                text: "こんにちは",
                value: "일본어"
            }]
        }
    })
</script>
1. child Component
- buttonInfo에 부모로부터 받은 button-info 데이터를 수신합니다.
- 콧수염 표현식으로 buttonInfo내 text를 button객체 innerText로, dataset에 lang 객체엔 buttonInfo내 value값을 지정합니다.
2. parent Component
- body로부터 data를 받을 buttons 속성과 이를 표현할 때 쓰일 msg 객체는 부모 컴포넌트내에서만 사용하기 위해 함수로 return 합니다.
(컴포넌트내 data옵션에서 객체를 함수로 return하는 이유는 이전 포스트 참조)
- buttons 데이터 수만큼 v-for를 이용해 반복적으로 생성하며 buttons의 데이터는 자식 컴포넌트에게 전달하기 위한 button-info에 v-bind 합니다.
3. child Component
- button 객체 클릭 시 clickEvent가 발생토록 합니다.
this.$emit('timeclick', e.target.innerText, e.target.dataset.test); //(사용자 정의 이벤트명, button 객체의 innerText, button 객체의 dataset.test)
- emit 메서드를 이용해 timeclick 이벤트를 발신합니다. 그러면 부모 컴포넌트에선 v-on 디렉티브를 이용해 timeclick 이벤트를 처리합니다. 필요한 매개변수는 emit 메서드로 함께 보내주도록 합니다.
3. 이벤트 버스 객체를 이용한 통신
부모-자식 관계가 아닌 형제, 부모-손자 등의 관계는 어찌해야 할까요?
이러한 경우에 사용하는 방법이 이벤트 버스 객체를 만드는 것입니다.
<!-- 첫번째 컴포넌트 -->
<template id="chidl1Template">
    <div>
        <button v-on:click="clickEvent">child1 button!!</button>
        <div>{{currentTime}}</div>
    </div>
</template>
<script type="text/javascript">
    Vue.component('child1-component', {
        template: '#chidl1Template',
        data: function() {
            return {
                currentTime: ''
            };
        },
        methods: {
            clickEvent: function() {
                var d = new Date();
                var t = d.toLocaleTimeString() + " " + d.getMilliseconds() + "ms";
                eventBus.$emit('click1', t);
                this.currentTime = t;
            }
        }
    });
</script>

<!-- 두번째 컴포넌트 -->
<template id="chidl2Template">
    <ul>
        <li v-for="time in timelist">{{time}}</li>
    </ul>
</template>
<script type="text/javascript">
    Vue.component('child2-component', {
        template: '#chidl2Template',
        data: function() {
            return {
                timelist: []
            };
        },
        created: function() {
            eventBus.$on('click1', this.child1Click);
        },
        methods: {
            child1Click: function(time) {
                this.timelist.push(time);
            }
        }
    });
</script>

<body>
    <div id="app">
        <child1-component></child1-component>
        <hr />
        <child2-component></child2-component>
    </div>
</body>
<script type="text/javascript">
    var vm = new Vue({
        el: "#app"
    })
</script>
이벤트를 수신하는 컴포넌트는 미리 이벤트 핸들러를 등록해두어야 합니다.
이를 위해서 created 이벤트 훅을 이용하여 Vue 인스턴스가 만들어질 때 $on 메서드를 사용해 이벤트 수신 정보를 등록해둡니다.
1. 1st child Component
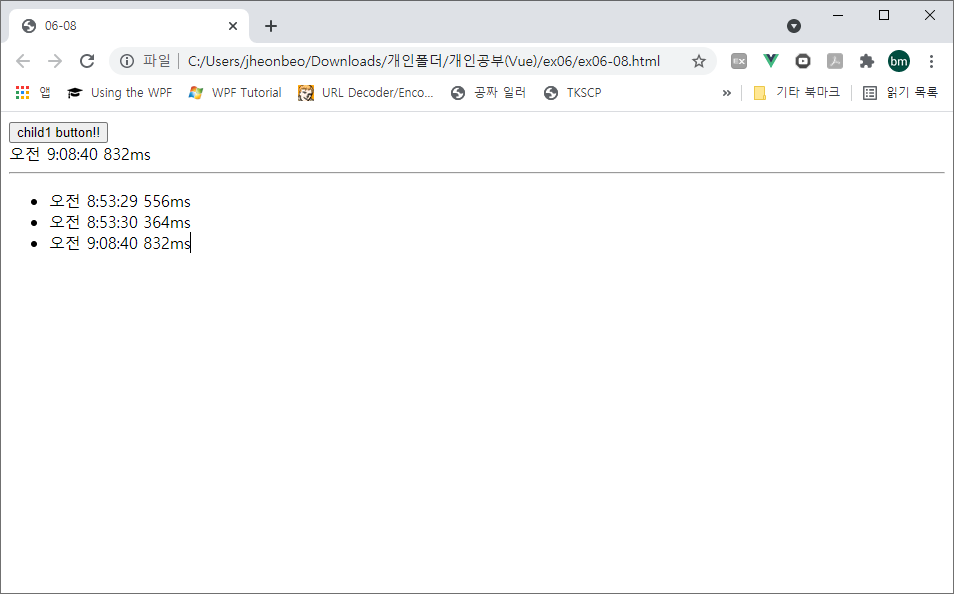
- 첫번째 컴포넌트의 버튼을 클릭하면 clickEvent 메서드를 호출하기위한 이벤트 버스의 $emit 메서드로 'click1' 이벤트를 발생시킵니다.
2. 2nd child Component
- 미리 이벤트가 바인딩되어 있어야 하므로 created 이벤트 훅에서 이벤트 버스의 $on 메서드로 'click1' 이벤트를 수신. 이벤트가 올때마다 child1Click 메서드를 실행토록 합니다.
- 시간 정보를 인자로 전달받아 timelist 배열에 추가토록 합니다.

'Vue' 카테고리의 다른 글
| Vue.js 컴포넌트 심화 (0) | 2022.01.06 |
|---|---|
| Vue-CLI 도구 (0) | 2021.09.28 |
| Vue.js 컴포넌트 기초 - 1 (0) | 2021.05.14 |
| Vue.js 스타일 (0) | 2021.03.25 |
| Vue.js 이벤트 처리 (0) | 2021.02.25 |
